How to Get Email Notifications When Someone Logs Into Your Windows PC

Windows 11 sends me an email whenever someone logs in to an account on my PC. If you’re interested in setting up a notification system like this, I’ll walk you through the steps.
Step 1: Create a Script to Send the Email
The first step is to write the script that sends an automatic email when someone signs in to a user account on your Windows 11 PC. This script contains your email account’s login details and the custom message that you receive when someone has signed to your PC.
This script stores your email password in plaintext. In theory, that is a security vulnerability if someone finds it and starts going through it. If you’re concerned about that security risk, you can create a throwaway email to use for this instead. That way there is no risk of someone gaining access to your real email.
To create the script, access Windows Search (press Windows+S), type Notepad, and launch the app. In a new document, type the following script:
# Email Settings
$smtpServer = "smtp.youremailprovider.com"
$smtpPort = "587"
$smtpUser = "yourname@youremailprovider.com"
$smtpPass = "youremailpassword"
$toEmail = "recipient@email.com"
$subject = "Login Alert on $env:COMPUTERNAME"
$body = "User $env:USERNAME has just logged in at $(Get-Date)."# Send Email
$msg = New-Object System.Net.Mail.MailMessage $smtpUser, $toEmail, $subject, $body
$smtp = New-Object Net.Mail.SmtpClient($smtpServer, $smtpPort)
$smtp.EnableSsl = $true
$smtp.Credentials = New-Object System.Net.NetworkCredential($smtpUser, $smtpPass)
$smtp.Send($msg)
In the script, in the Email Settings section, replace the SMTP settings with those that reflect your email account. You can get these details from Gmail, Outlook, or another email provider that you use. In case you’ve enabled two-factor authentication for your email account, you’ll have to create an app-specific password and use that instead in the SMTP settings section.
Related
Using Your Real Email to Sign In? Your Privacy Is at Risk
You’d be surprised what somebody can learn just by knowing your email address.
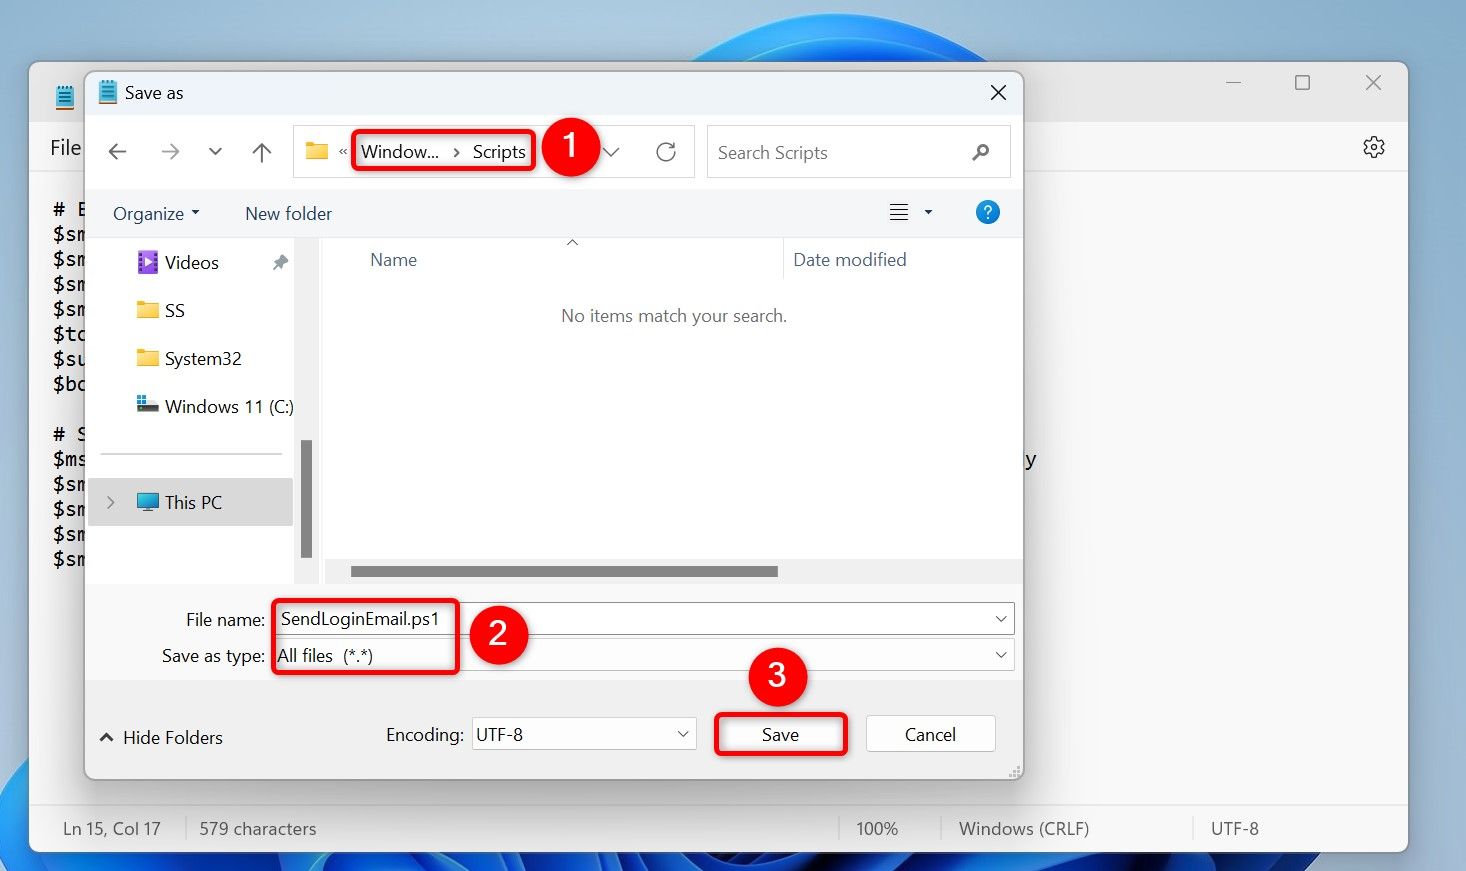
After you’ve configured the settings in the script, save the script. From Notepad’s menu bar, select File > Save As. On the Save As window, choose the folder in which you want to save the file. Select the “Save as Type” drop-down menu and choose “All Files.” Click the “File Name” field and type something like SendLoginEmail.ps1. Then, choose “Save.”
Step 2: Create a Task in Task Scheduler
Your email script is ready, and you’ll now use Task Scheduler to run the script each time someone logs in to a user account on your PC.
Related
You’re Not Making the Most of Task Scheduler in Windows
Save time by automating tasks!
To do that, open Windows Search (press Windows+S), type Task Scheduler, and launch the utility. On the right pane, click “Create Task.”
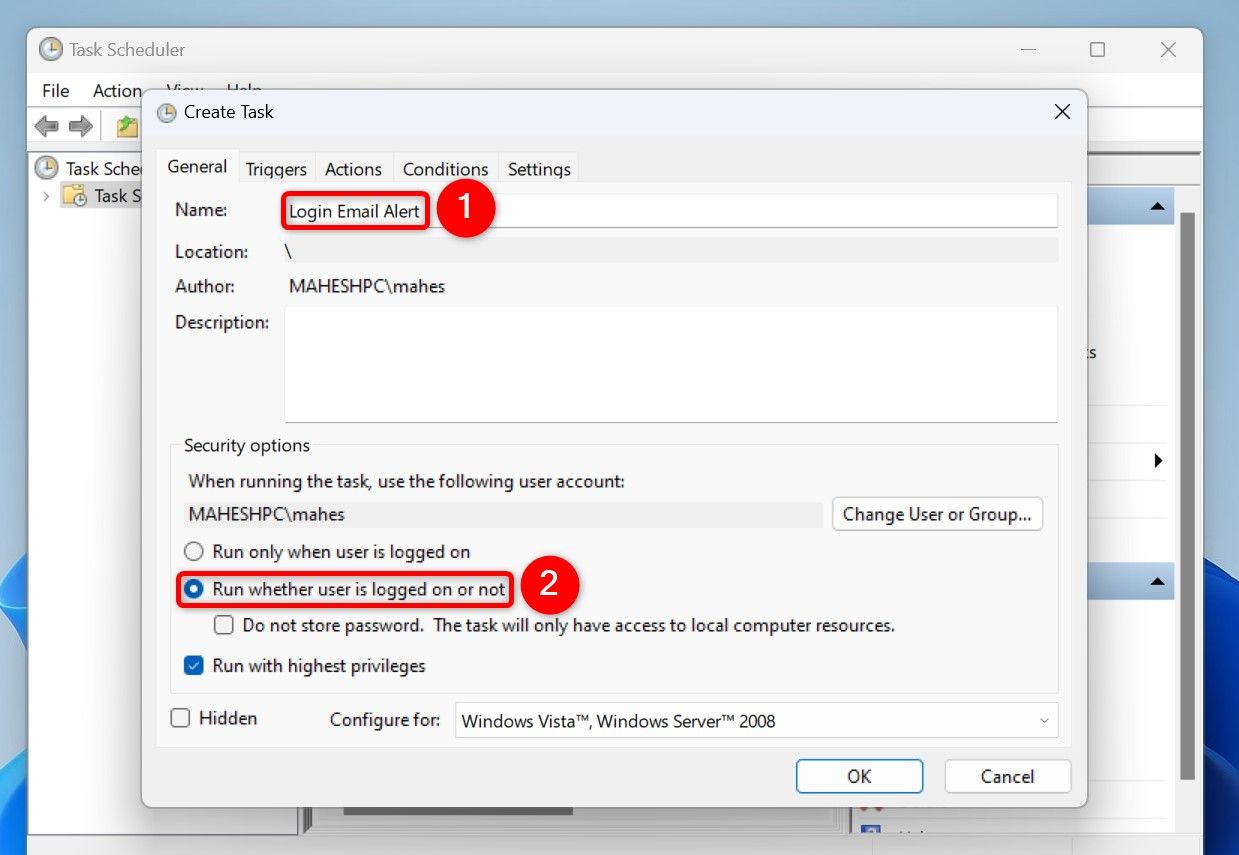
In the General tab, select the “Name” field and type a name for the task. This could be something like Login Email Alert. Turn on the “Run Whether User Is Logged On or Not” and “Run With Highest Privileges” options.
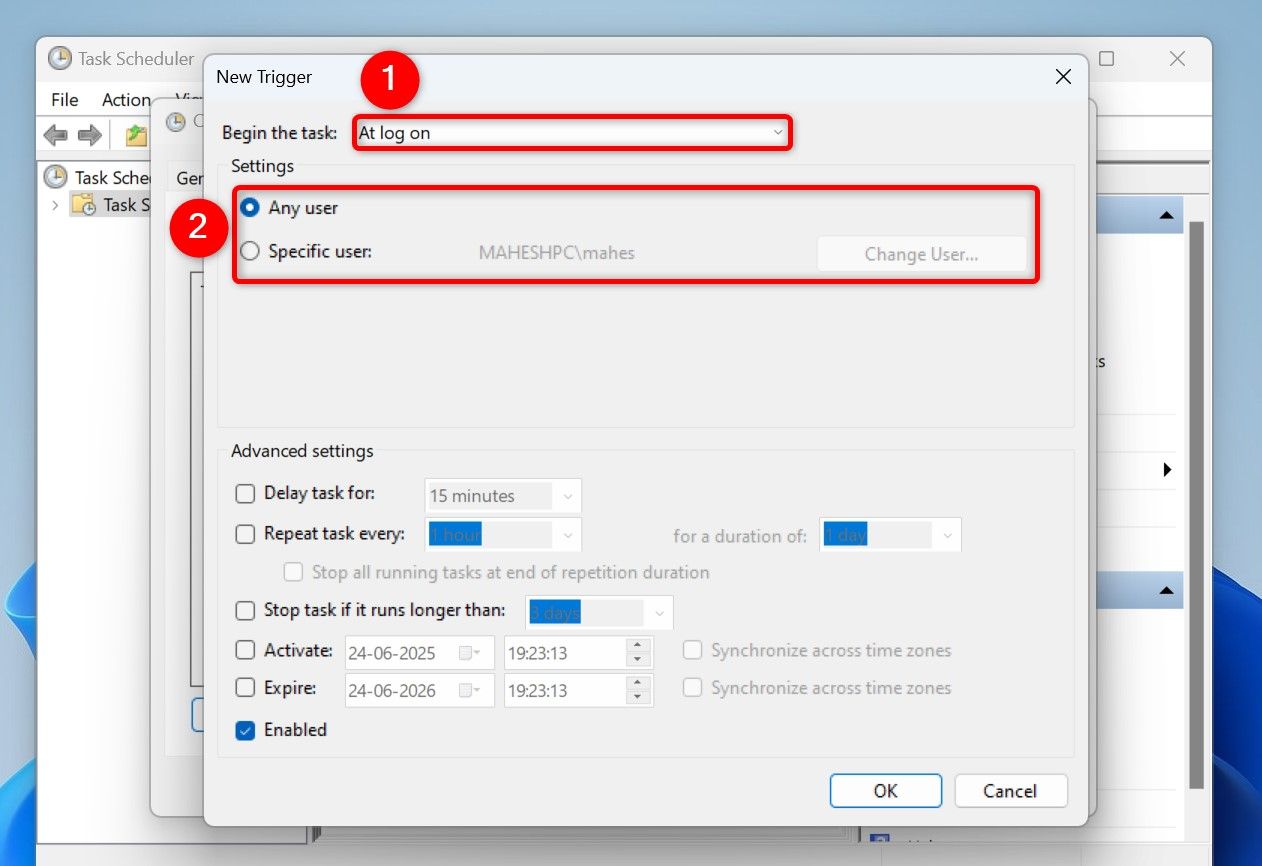
From the top bar, open the “Triggers” tab. Click “New” to add a new trigger. Select the “Begin the Task” drop-down menu and choose “At Log On.”
If you want to get an email alert when any user logs in to your PC, choose “Any User.” To only get an alert when someone logs in to a specific user account, enable “Specific User.” Then, click “Change User” and select the account.
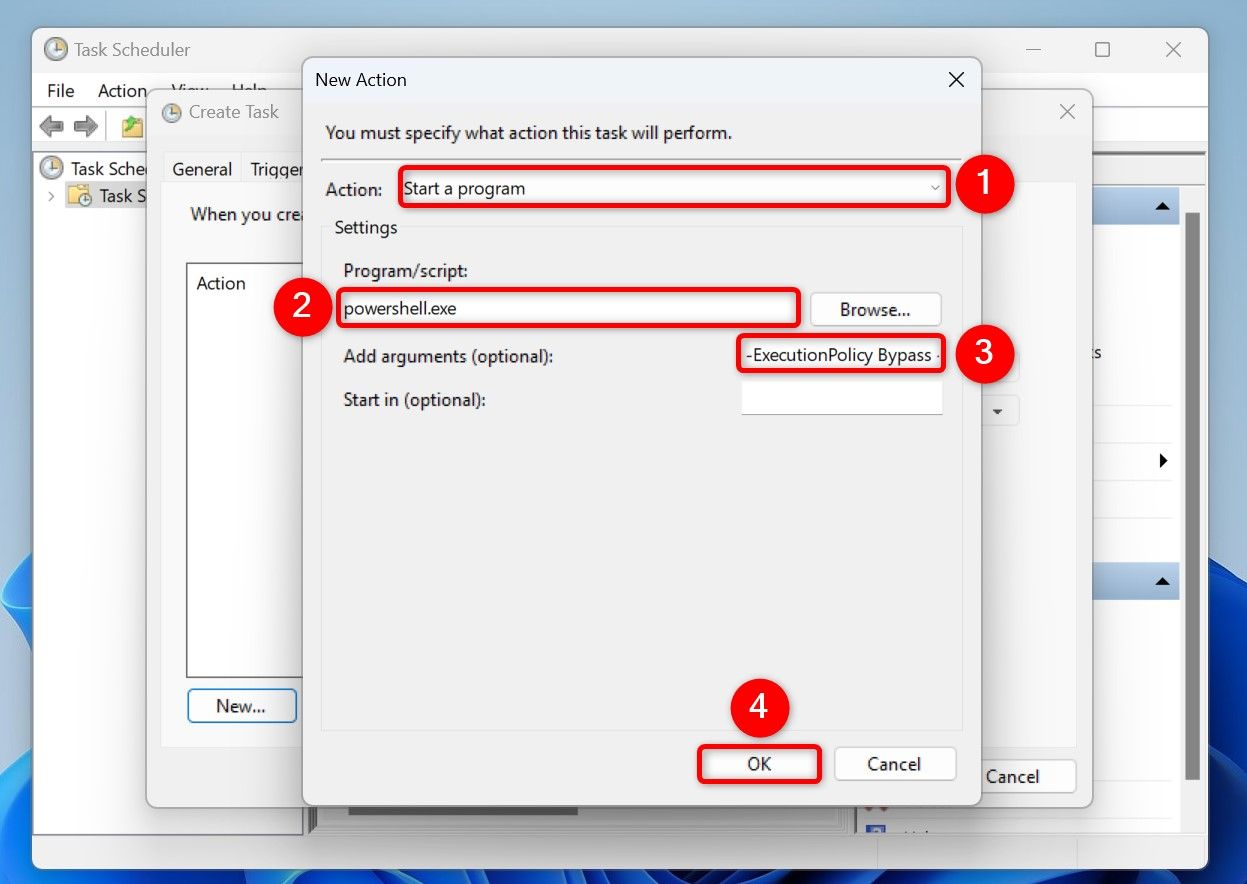
Open the “Actions” tab and click “New” to add a new action. Select the “Action” drop-down menu and choose “Start a Program.” Select the “Program/Script” field and type powershell.exe. In the “Add Arguments (Optional)” field, type the following. Make sure to replace the script path with the path to the script you created earlier.
-ExecutionPolicy Bypass -File "C:\Scripts\SendLoginEmail.ps1"
Select “OK,” enter your admin password, and save the task.
From now on, Windows 11 will automatically send you an email when someone logs in to your PC. In the future, if you don’t want to receive these alerts, right-click your task in Task Scheduler and choose “Delete.”
To quickly find these emails in your inbox, you can set up a label. The script above uses “Login Alert on” as the subject line, which you can use to filter all these emails.
Hide the PowerShell Window on Startup
To send you an email alert when someone logs in to your PC, Windows 11 launches PowerShell for a brief moment. This means anyone logging in to your PC will see that window. If you’d like to hide the window, do the following.
Related
How to Hide Your Windows Folders Behind a Secret Keyboard Shortcut
And only you know that key combo.
Open Notepad and type the following. Make sure to replace the script path with your script’s path.
Set objShell = CreateObject("Wscript.Shell")
objShell.Run "powershell.exe -ExecutionPolicy Bypass -File ""C:\Scripts\SendLoginEmail.ps1""", 0, False
From Notepad’s menu bar, select File > Save As. Select the folder in which you want to save the script. Click the “Save as Type” drop-down menu and choose “All Files.” Click the “File Name” field and type SendLoginEmail.vbs. Then, choose “Save.”
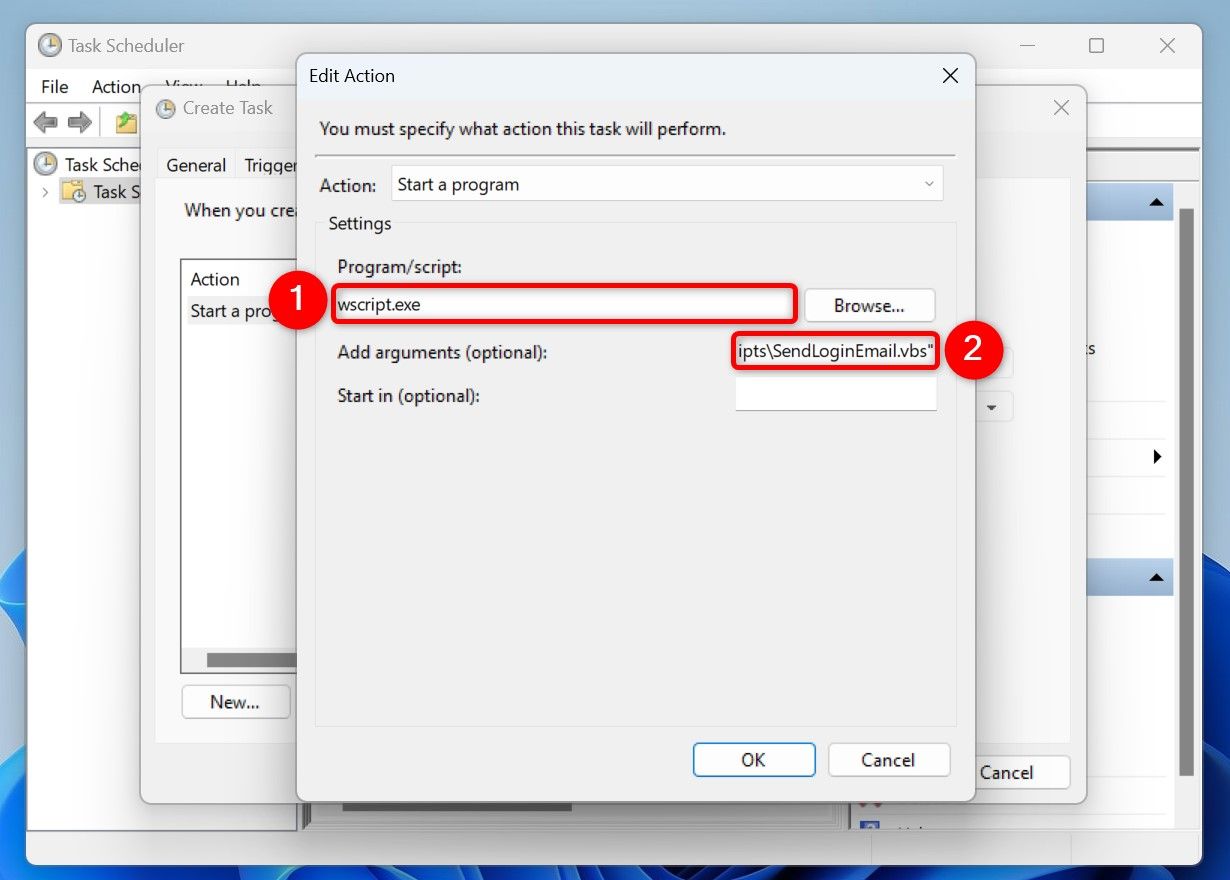
Open Task Scheduler and edit your task. For the action, change “Program/Script” to wscript.exe. In the “Add Arguments (Optional)” field, type the following, replacing the path with your script’s path.
"C:\Scripts\SendLoginEmail.vbs"
And you’re done.
And that’s how you get an email alert when someone accesses your Windows 11 PC. If you want to allow others to use your computer, you can consider setting up a guest account on Windows 11.
